Showing posts with label James. Show all posts

Caramel Apple Cake

This recipe is adapted from the one at A Hint of Honey.

Makes 4-layer, 8-9 inch round cake.


3 ¾ cups all-purpose flour
1 Tbsp. baking powder
1½ tsp. baking soda
½ tsp. salt
1½ cups brown sugar
¾ cup canola oil
¾ cup apple butter
3/4 cup caramel sauce (like the kind you use on ice cream)
2 tsp. vanilla extract
3 eggs
1½ cups buttermilk

Preheat oven to 350 F. Grease and flour four (8 or 9 inch) round cake pans and set aside.
In a large bowl, whisk together  flour, baking powder, baking soda, cinnamon and salt. Set aside.
With a Kitchenaid, beat sugar and oil together until well combined, about 30 seconds. Add caramel and mix until blended. Add apple butter and vanilla, beat for 30 seconds, then add eggs one at a time, beating well after each addition. Add flour mixture in three parts, alternating with the buttermilk, and continuing to beat until well combined.
Pour batter into prepared cake pans and bake until golden brown and a toothpick inserted in the middle of each cake comes out clean, about 30-40 minutes. Set aside to let cool for 10 minutes, then gently loosen cakes and turn out onto a cooking rack; set aside to let cool completely.


Apple Cider-Cinnamon Frosting7 1/2-8 cups confectioners’ sugar (to desired consistency)
3/4 cup (1 1/2 sticks) butter, softened
1/2 cup apple cider or apple juice
1 tsp. ground cinnamon
pinch of salt
1/4 cup caramel sauce

Put sugar, butter, cider, cinnamon and salt into a large bowl and beat with an electric mixer until light and fluffy, (about 5 minutes.) Arrange one cake on a large plate and spread about 1/2 cup of the frosting evenly over the top. Continue in the same way with each layer, including the top of the cake. Frost the sides of entire cake with remaining frosting. Drizzle with caramel sauce. Allow frosting to set before serving.

Cinnamon Cheesecake Dessert

This recipe was originally called Sopapilla Cheesecake, but the name never stuck at our house.
This dessert was universally liked and was eaten up in one evening.
Photo and recipe from Real Mom Kitchen.
2 cans Pillsbury Crescent rolls
2-8oz Cream Cheese (room temperature)
1 1/2 cups Sugar
1 1/2 tsp. Vanilla extract
1 tsp Cinnamon
1 stick (1/2 cup) butter

Spray a 9 x 13 pan with cooking spray. Unroll and press 1 can crescent rolls into the bottom of your baking dish press the seams together. In a separate bowl blend the cream cheese, 1 cup sugar and vanilla extract (I also think it would be fun to try other extracts like almond extract?) and spread over top of dough. Unroll the second can of crescent rolls and place on top of the cream cheese mixture pressing seams together again. Melt butter and pour over top layer of crescents. Mix the reaming 1/2 cup of sugar and cinnamon together. Sprinkle cinnamon sugar mixture generously over the top. (You can add more, if you wish.) Bake at 350 degrees for 30 minutes until bubbly and bottom crust is slightly brown. Cool, slice and enjoy!

Cheesy Garlic Bread Sticks

This recipe is from Lauren's Latest and it may well be the best recipe I have tried all year. Stop by her blog and see her photo tutorial.

1/2 recipe Pizza Dough
2 tablespoons salted butter
2 cloves garlic, finely minced
1/4 cup grated parmesan cheese
1/4 pound grated mozzarella cheese
salt and pepper, to taste

Preheat oven to 500 degrees (with pizza stone inside, if you are using one.)
Mix butter and garlic in a small bowl and set aside.
Spread pizza dough out into a 12-inch pizza pan (or on parchment paper if you are using a pizza stone.)
Spread the butter and garlic mixture over dough and top with parmesan and mozzarella cheeses. Top with a light sprinkling of salt and pepper, if desired. (Transfer to pizza stone, if you are using one.)
Bake 9-10 minutes or until bubbly and golden. Remove from oven and cool 1-2 minutes before cutting. Serve hot, with marinara.

The Very Best Pizza Dough in the World

And I am not kidding. This recipe comes from Lauren's Latest, and you should really go to her blog first as she has a step-by-step photo tutorial. 

Makes 2-12 inch pizzas or approximately 1 lb. of dough.
1 cup warm water
2 1/4 teaspoons active dry yeast
1 tablespoon honey {or sugar}
2 teaspoons salt
2 tablespoons olive or canola oil
2 1/2-3 1/2 cups bread flour {depending on the heat & humidity}

In a large mixing bowl, preferably that of a stand mixer, stir yeast and honey into warm water. Sit for 5-10 minutes or until bubbles form and mixture starts to foam. This tells you that the yeast is alive and kicking. Pour in salt, oil and half the flour and mix. Once that flour is incorporated, start adding flour in bit by bit until you get the pizza dough to the consistency you want: slightly tacky, but when you touch it it doesn’t stick to your hands. Once you reach this stage, turn the mixer on high to knead for 6 minutes. Turn a timer on and walk away! Resist the temptation to stop earlier than 6 minutes! The dough should be smooth and easy to work with. And the bowl should be clean. Lightly grease the bowl & the dough so it doesn’t dry out, cover with plastic wrap and let it rise 1-2 hours. Now you can turn this dough into anything your little heart desires.

Cookie Dough Cheesecake

photo and recipe from A Thought Chronicle
2 pkg. (8 oz. each) Philadelphia Cream Cheese, softened
1/2 cup sugar
1/2 tsp. vanilla
2 eggs
1 1/4 cup prepared or refrigerated chocolate chip cookie dough, divided
1 Honey Maid Graham Pie Crust (6 oz.) (or make your own.)

Preheat oven to 350 degrees F. Beat cream cheese, sugar and vanilla in large bowl with electric mixer on medium speed until well blended. Add eggs; mix just until blended. Take 1/2 cup of the cookie dough and press small balls of it into the crust, especially around the edges. Drop 1/2 cup of the cookie dough by teaspoonfuls into batter. Stir gently.
Pour into crust. Top with level teaspoonfuls of the remaining 1/4 cup cookie dough.
Bake 40 minutes or until center is almost set. Cool. Refrigerate 3 hours or over night. Store leftover cheesecake in refrigerator

Cheddar and Cranberry Spread

(adapted from All Recipes)

1 (8 ounce) package cream cheese, softened
2 cups shredded sharp Cheddar cheese
2 tablespoons milk
1/8 teaspoon mustard powder
dash cayenne pepper
1/4 cup chopped dried cranberries

In a mixer bowl, cream together the cream cheese, Cheddar cheese and milk until well blended. Season with mustard powder and cayenne pepper, then mix in dried cranberries. Use immediately, or refrigerate for up to 3 days.

Fresh Peach Pie

You should visit Make Do for their tutorial.

1 cup Water
1 cup Sugar
8 Tbsp. Corn Starch
Yellow Food Coloring
¼ cup fresh Lemon Juice
Pinch of Salt
¼ cup Butter (1/2 stick)
6 Peaches, peeled and sliced
Precooked 9 inch Pie Shell

Combine water, sugar, cornstarch, food coloring, lemon juice and salt in a medium saucepan. Whisk until combined. Stirring constantly, cook over medium heat until thick and hard to stir. Remove from heat and add butter, stir until melted and combined. Add peaches and gently fold to coat. Pour into precooked pie shell. Refrigerate for 4 hours to set.
Top with whipped cream and serve.

Cloud Parfaits

white puffy clouds in a blue jello sky
2 packages of Berry Blue Jello
2 cups of ice

2 pints of whipping cream
2/3 cup sugar
1 tea. lemon juice
2 teas. vanilla extract
parfait glasses or any clear containers that you can see through

Make your whipped cream as per the instructions here, but continue whipping it until it forms super stiff peaks. You want to make sure that it is good and stiff so that if will hold it’s shape later in the jello. Keep chilled in fridge until needed.
Now it’s time to get your jello ready. Using both boxes of Jello, follow the directions on the back for Quick Set jello, doubling the amounts, of course. Stir the ice around in the bowl for about 5 minutes until the jello has thickened and remove any left over ice that didn’t melt. It should be jelled enough to scoop out on a spoon.
Start by placing a few spoonfuls of jello in the bottom of your parfait glass, then take your whipped cream from the fridge and drop in a spoonful or two and press it against the side of the glass. This is going to form your cloud in the sky.

Continue layering the jello and whipped cream, alternating where you place your clouds so that you get a staggered effect.
This idea comes from Huber Hof Academy, but the link no longer works, so I can't include one.

Watermelon Waffles for August 3rd, National Watermelon Day

These cute watermelon waffles are just chocolate chip waffles...

made with your favorite waffle batter dyed pink and green.

A great addition to our watermelon week!
This idea comes from Random Thoughts of a Supermom.


RandomThoughtsofaSUPERMOM

Watermelon Pie for National Watermelon Day {August 3rd}

For this watermelon-look-alike dessert, I combined the ideas of the Edible Layers of the Earth project and this recipe from Catholic Cuisine.

We used:
Lime Sherbet
Pineapple sherbet (you could use vanilla ice cream instead)
Raspberry Sherbet
Mini chocolate chips

Line the inside of the bowl with a layer of lime sherbet, about 1 inch thick. I am not giving amounts here because the size of bowls will vary.
Place bowl into the freezer for a few minutes until the sherbet hardens a bit. At the same time get the pineapple sherbet out of the freezer so that it can soften a bit while the green layer hardens.


Add a thin layer of pineapple sherbet about a 1/2 inch thick on top of the lime sherbet.
Return bowl to the freezer until hardened, and get out the raspberry sherbet.
 

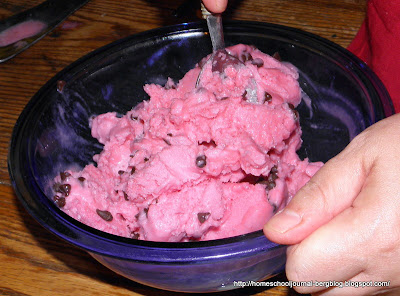
Once the raspberry sherbet has softened, mix chocolate chips into a small bowl of it so that it looks like the seeds in a watermelon.
 
Fill the cavity that is left with the raspberry-chocolate chip sherbet. Press down firmly.
Cover with plastic wrap and freeze solidly (for a few hours.)
 
When you are ready to serve set bowl in a larger bowl of hot water for a minute to help it slip out of the bowl. Turn over bowl onto a platter or plate and cut slices out to serve.
You can see that it is easy to make the white layer too thick. That layer should be very thin.
Watermelon Sherbet Pie!

Red Berries and Chocolate Tea Time

Today we had a summertime red berries and chocolate tea time.


These pretty and delicious treats are easy to make. You will need raspberries and chocolate chips for the raspberry treat and angel food cake, chocolate glaze, strawberries and skewers for the strawberry kabobs. You can use just chocolate syrup for the kabobs but the glaze holds on more firmly than the syrup.

I saw these simply sweet treats at Sasha Libby, and they are as simple to make as they look. Just take a chocolate chip and insert it, carefully pointy side in, in the opening of a raspberry. They are especially good with white chocolate chips.


I found these at My Own Road. Take a angel food cake and cut it into squares. Skewer them alternating with strawberries (with stems removed, of course). Once finished, squeeze on chocolate glaze. You can make your own or use chocolate sauce but we used Amazing Glazes from Duncan Hines and it has rave reviews from my boys.
The whole tea time treats only took a few minutes to make and from how quickly they went, it seems we will be doing it again.

Watermelon Slushie {National Watermelon Day is August 3rd}


2 cups frozen watermelon
juice of 1/2 lime or lemon
1 ripe banana, peeled (not frozen)

Place everything in a blender and let it blend.

Homemade Whipped Cream

1 pint whipping cream
1/3 cup powdered sugar
1/2 tea. lemon juice
1 tea. vanilla extract

Start by placing your whipping cream in the large bowl of a mixer.  Beat on high speed and as it is mixing, you can slowly add the remaining ingredients. Continue whipping cream until it becomes the consistency you want. Keep chilled in fridge until you are ready to use it.

Watermelon Shark

This idea comes from the Watermelon Promotion Board, and Sun Scholars has a photo tutorial on how to make it.
Just in case the links break in the future, I have included the instructions here.
National Watermelon Day is August 3rd.
1 oblong watermelon
Large knife
Smaller utility knife
Large spoon
Paring knife or the tip of a vegetable peeler
2 blueberries
Toothpicks or wooden skewers
Swedish fish candies
Wash and dry the watermelon. Cut off 1/3 of the watermelon at a diagonal angle.
Stand the remaining 2/3 upright on your work surface and cut a line for the mouth and eye sockets. Make sure here that you are adding about an inch or so for the teeth you will be cutting out of the rind. Cut out the mouth. Make sure you save the mouth wedge for the fin.
Next, with a small knife, carefully score around your shark mouth, about a 1/2 inch up and only about 2-3 millimeters deep. This will help you to peal off the rind down to your cut so you can begin to form the teeth. carefully cut away the green rind down to your score lines around the mouth, and set it aside to use later.
Use a large spoon to scoop out the watermelon flesh, leaving 3" intact at the base.
Cut out triangles for the teeth, using a smaller utility knife.
Use small knife and a melon baller to cut into the rind, being careful not to cut all the way through, to make an eye socket and the lines for the gills behind the mouth. Use a paring knife to trim the green area around the eyes. Break a toothpick in half and used that to attach a blueberry to the center of each eye.
Take the wedge you cut to form the shark mouth to make your fin. Cut wedge into triangles to make the fins. Remove the watermelon from the other side. You might need to cut a bit of a curve on the bottom side to have it fit.
Fill the mouth with triangle shapes of watermelon, accented with Swedish fish. Now you have a shark!

Homemade Ice Cream in a Can

You must be careful if you are kicking or rolling the can on a trampoline.
1 pint of cream or half and half
1/3 cup granulated sugar
4 tablespoons of your favorite instant pudding mix
about 10 cups ice
1 1/2 cup ice cream rock salt
1 ziploc baggie
3-pound coffee can, emptied and rinsed
1-pound coffee can, emptied and rinsed
Duct tape

Put the cream, sugar and instant pudding mix into the baggie. Seal well and gently shake bag to mix ingredients. Place inside the 1-pound coffee can, cover the can with it’s corresponding lid and seal with duct tape. Place 1-pound coffee can inside the 3-pound coffee can. Surround the smaller can with ice and salt by layering 5 cups of ice with 3/4 cup of salt. Use duct tape to seal the 3-pound can with its corresponding lid and start rolling. Here is where you can get creative on the most fun way of keeping the can rolling. Have the kids face each other and roll the can back and forth on its side for 20 minutes. Play kick-the-can or a relay race.What creative way can you come up with?
After 20 minutes, open the cans and check the ice cream. If not solid yet, reseal the lid on the smaller can with duct tape, and set it aside. Quickly dump the melted ice water from the large can, and place the smaller can into the larger can again. Now you need to surround the smaller can with remaining ice and salt as you did before. Once that is done, put the lid on the larger can and seal with duct tape again. Roll the large can for 20 minutes more. 
This recipe comes from Kaboose.

Butterfly Lunch

tutorial for how to make this chicken nugget and chips butterfly at Hungry Happenings
In the summertime I like to take a little extra time to make meals and snacks more fun. Today we had these chicken nugget and chips butterflies for lunch. I made the first one for them, and then put the rest of the chips, nuggets and chow mein noodles on the table and let them make their own butterflies. They had so much fun making and eating them!

S'mores Cookie Bars

My test testers loved these cookie bars from Mommy's Kitchen, but all agreed that they needed more chocolate in them because the graham cracker layer is thicker than graham crackers. I have modified the recipe to include two layers of chocolate.
1 stick of butter, room temperature (1/2 cup)
1/4 cup brown sugar
1/2 cup sugar
1 large egg
1 tsp. vanilla extract
1 1/3 cups all purpose flour
3/4 cups graham cracker crumbs ( or 7 full-sized graham cracker sheets, processed til fine)
1 tsp. baking powder
1/4 tsp. salt
4 king-sized Hershey’s milk chocolate bars (or 8 regular bars)
1-7 oz jar marshmallow creme/fluff

Preheat the oven to 350 degrees. Grease an 8-inch square baking pan (I line my pan with foil for easy removal and cutting). Use an electric mixer to cream together butter and both sugars until light and fluffy. Beat in egg and vanilla. Set aside.
Meanwhile,whisk together flour, graham cracker crumbs, baking powder and salt. Slowly add flour mixture to the creamed butter mixture until combined.

Divide dough in half and press half of dough into an even layer on the bottom of the prepared pan.

Remember to put a second layer of chocolate bars on top. This is only one layer.
Place chocolate bars over dough into two layers, one on top the other.

Spread chocolate with marshmallow creme or fluff.
Place blobs of it on the chocolate and then spread it around.

Roll the remaining dough out between two pieces of waxed paper and then flip it over on top and press any the pieces that break off together.
Bake for 30 to 35 minutes until lightly browned. Be sure to cool completely before cutting into bars. Makes 16 squares.
Mommy’s Kitchen

I Have a Puzzle for You

If you had to choose five foods with which to live on, what would they be?

Easy Mini Eclairs

Original recipe from Donna Hay.

You will need:
2 packages lady fingers
1 bag chocolate chips, your favorite kind
1/2-1 tea. shortening or oil
1 pint heavy whipping cream
1/3 cup powdered sugar
1 tea. vanilla extract
1 tea. lemon juice (optional)

Frosting
1 bag chocolate chips, your favorite kind
1/2-1 tea. shortening or oil

Melt the chocolate chips in a double boiler or chocolate melter with the shortening or oil.

Filling (whipped cream)
You can substitute your favorite store-bought whipped cream, but it is really easy to make at home and so good made fresh.

1 pint heavy whipping cream
1/3 cup powdered sugar
1 tea. vanilla extract
1 tea. lemon juice (optional, but makes the cream set up quicker and easier)

Put all ingredients into the bowl of your mixer and beat at the highest speed you can without it splashing out until it becomes solid and fluffy (about 5 minutes.)
This will make more whipped cream than you need for this recipe, but I am sure you can find some use for the leftover. : ) Really good on hot chocolate or ice cream.

To assemble the eclairs:
Place the bases of the lady fingers onto a wire rack.
Spoon on the whipped cream mixture and top with the remaining lady fingers.
Spread chocolate mixture over the tops of the lady fingers.
Serve immediately. These do not store well. Can be made in half-recipes just for your family, or whole recipes to take to gatherings.

"Planting" Mint Cups

When I saw these adorable little desserts at Practically Living, I just knew I had to make them. They look so much like a little mint garden! I modified the recipe a little.

For four servings, you will need:

1 box chocolate pudding (not instant)
1/3 of a box of Cool Mint Oreos, crushed in a blender or food processor
four sprigs of fresh mint
wooden disposable spoons
four clear cups

Make the chocolate pudding a let it cool a little before you divide it among four plastic cups. Let them firm in the refrigerator. Once they are firm, place 1/4 of the crushed mint Oreos on top of the pudding and press the mint sprigs into the cups, pushing them down in the Oreo crumbs until they sit firmly.
Put names or initials on the wooden spoons and them push them straight into the cups to resemble plant markers. If you do not have wooden spoons, you can use either popsicle sticks or plastic spoons.